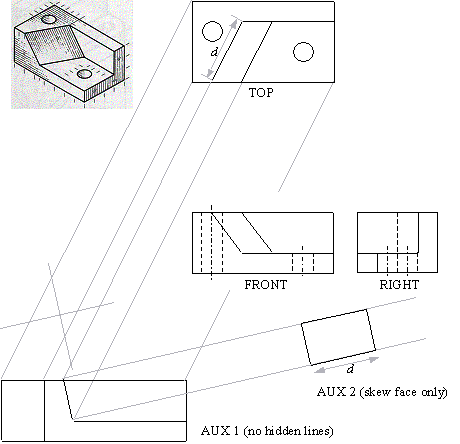
Q1 Draw orthogonal views for the object shown below; use these views to draw an auxiliary view that shows the oblique face in true size.

Note: two auxiliary views are needed to get a true size projection of a skew face - the first auxiliary projection shows the face as an edge; the second projection is along the direction perpendicular to this edge, therefore it shows the face in true size.
Q2 A unit cube is rotated and tilted and its orthogonal projection is drawn in full scale on the XZ plane. In the projection, the lengths of the three orthogonal edges are 0.8165, 0.8165 and 0.866, as shown in the figure (a) below. Find the direction cosines (see figure (b)) of each these three edges in the global coordinate frame.
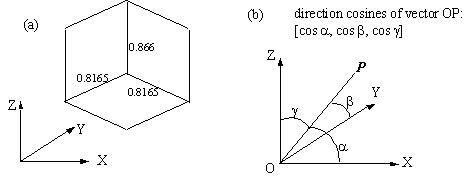
Note that for vector OP = [px, py, pz], |OP|cosa = px, |OP|cosb = py, and |OP|cosg = pz. Therefore, the DC's of OP are [ px/|OP|, py/|OP|, pz/|OP|]; if |OP| = 1, that is, if P is a unit vector, then the DC's are just the X-, Y- and Z- coordinates of the end point OP.
Therefore, we find the coordinates of end points A, B C of edges a, b, c respectively.
The cube was first rotated about Z-axis by 45ş; edge a is still aligned with Z.
Then the cube was tilted by angle equal to ga;
cos ga = 0.866, orga = 30ş.
Thus the coordinates of point A are: [0.0, cos60, cos30] = [0.0, 0.5, 0.866], which are also the DC's of OA.
X-coordinate of Point B = cos45 = -0.707
Y-coordinate of point B = cos45 x cos30 = 0.6124
Z-coordinate of B = - cos45 x sin 30 = -0.3535
Which gives the DC's of OB = [-0.707, 0.6124, -0.3535]
And it is easy to see that the DC's of point OC = [0.707, 0.6124, 0.3535]
Q3 The following figure shows the location and size tolerances on a hole in a part. To test if the part is acceptably manufactured, three cylindrical gauges will be used: The first two are the cylindrical 'go' and 'no-go' gauges to check if the hole size is larger than the lower limit, and smaller than the upper limit respectively. The third cylindrical gauge will be placed accurately on a positioning table, to test if the location of the hole center is within specified tolerance.
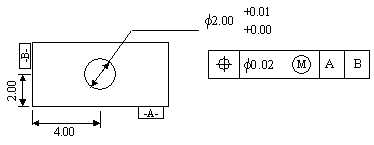
(a) What are the sizes of the 'go' and 'no-go' gauges ?
The 'go' gauge checks if the hole is larger than its lower limit; it's diameter = 2.00.
The 'no-go' gauge checks if the size is less than the upper limit; it's diameter = 2.01.
(b) Draw a figure to indicate the position and the size of the third gauge.
At MMC, the size of the hole = 2.00. Since the positional tolerance (true position) is a circle of diameter 0.02, therefore the center of the MMC hole may lie anywhere inside the tolerance zone shown in blue color. Thus the gauge must be located at coordinates (4.00, 2.00) and have diameter = 1.98.

Let the actual size of the hole be 2.00+t, (t < 0.01). Then the center of the hole may be located at any point in a circle of diameter (0.02 + t), and still the hole will fit the gauge. Hence the actual positional tolerance on the center of the hole = (0.02+ t); in the figure, the pink circle shows an acceptable hole that will fit through the gauge, although the center of the pink hole is outside the gray tolerance zone.
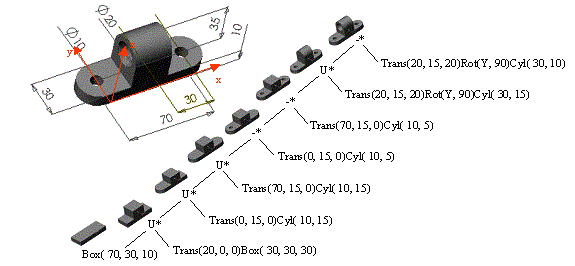
Q4 Using CSG primitives Block and Cylinder, show a CSG tree for the part below [note: all holes are concentric to the semi-circular ends].
